
Plastering Used to Terrify me, Now The Results Are Stunning
Plastering Used to Terrify me, Now The Results Are Stunning I remember the first time I have done plaster. It was a disaster. A friend


A building and renovation company that has been operating continuously since its foundation in 2005.
We are proud to help our Clients across Cambridge, London and Norwich areas.
If you haven’t moved into a completely new place I am 100% positive you are or have been facing this challenge: how to fit cabinets on uneven wall. Bad news are even in brand new places it’s not so uncommon.
But good news are there are some easy solutions to that. The short answer is that you have to prepare the wall first. Depending on the nature and complexity of an issue it might be necessary to plaster the whole wall.
Ultimately build a stud wall on top of the old one and fix plasterboards to have perfectly even surface.
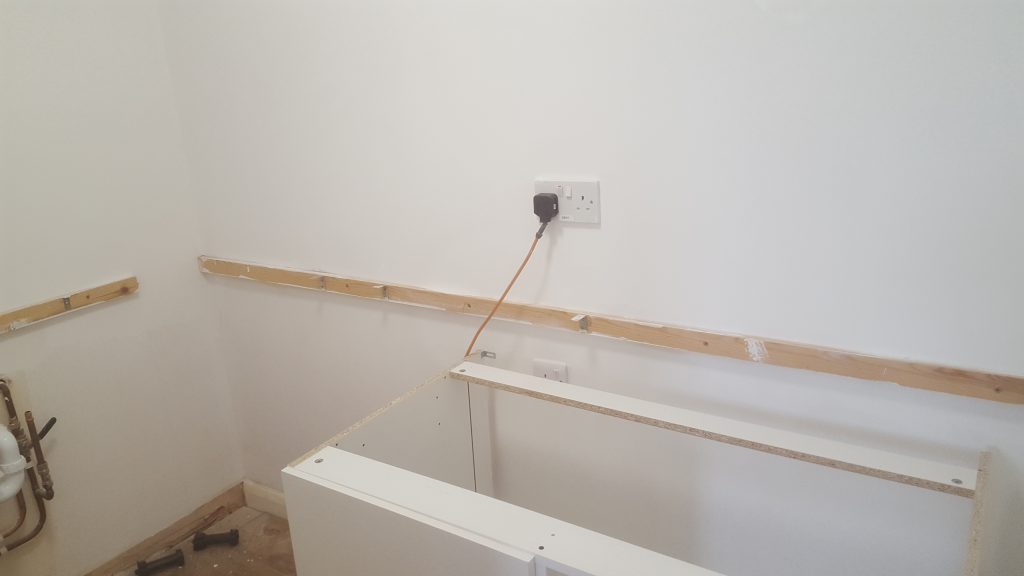
In other cases you might have to take out the plasterboards and adjust the studs that are off. Luckily, in most cases it is enough to fix two or even one wooden batten to the wall. It will a role of spot-on wall.
As a matter of fact, it will make the whole process of fitting the cabinets so much easier and quicker. Of course it’s impossible to go through all cases.
Nonetheless, below I have put down together some scenarios and solutions to potential problems you might have when fitting your kitchen units on uneven walls.
As mentioned above it’s probably the most typical thing on earth that walls in kitchen are not even. Cambridge is full of beautiful and vintage estates which unfortunately are not being spared by ravages of time.
It is especially well seen in old houses and flats, but do not take it for granted that in newly built places everything is perfectly nice and square.
You might be surprised how awry walls can be in brand new buildings.
Nonetheless, it all can be fixed and prepared to fit your new kitchen as painless as it possibly can be. In most common scenarios this problem can be fixed in 3 ways depending on how bad the condition of the wall is.
After it has been taken care of it’s piece of a cake to fit cabinets on the wall.

In worst case, when your kitchen wall is a complete disaster the most efficient solution is simply building a thin wall on top of the old one. The good news is you can do it on your own if you have a saw, drill, spirit level and drill driver.
How do you do that? You can start by fixing to the wall two wooden battens horizontally on top and bottom of the wall. First, use the spirit level to check if the wall is straight.
It might be necessary to play around to make it level as well.
Next, add vertical studs every 60cm, so the plasterboards can be properly fixed. Ideally the studs should fit tightly between top and bottom battens.
Another step is to check and adjust the studs as necessary to make them level before fixing to the wall. You should also make sure to use big enough wall plugs.
Especially if you are planning to use the construction for something more than just fixing the plasterboards.
Now, you are probably wondering how thick the wood should be. And the answer to that is… it depends. As always, right? 🙂 if it should only cover the imperfections of the wall it can be fairly thin or thick/thin as the wall allows to cover everything up.
However, if you want to hang cabinets on that wall consider using a little bit thicker pieces of wood so the wall plugs can fix it nicely altogether.
If your wall can still be saved and it’s in moderate good condition the most efficient solution will be to plaster the whole or part of the wall. In such case, however, I wouldn’t recommend doing it on your own.
You can probably find plenty of “how-to” videos on that subject and I could even personally recommend a handful of really good ones myself!
But when it comes to plastering it’s not that much about knowing how to do it or how to prepare beforehand. It’s much more about practice than anything else and believe me – if you haven’t done it before you will lose time and money and it still won’t be done right.
Plastering Used to Terrify me, Now The Results Are Stunning I remember the first time I have done plaster. It was a disaster. A friend
The easiest and also the quickest solution to fit kitchen cabinets on uneven wall is to simply fix one or two wooden battens that will play the role of a guideway for all cabinets.
This however depends greatly on the condition of the wall and if the damages are too big it might be necessary to take care of biggest holes before any further works.
Fortunately, from our experience we can tell in most cases it does the job.
The trick here is to take the piece of wood to cover the longest possible distance. Making the same from several pieces can also work if a wall is fairly straight.
Using one long batten will ensure cabinets are perfectly inline and works like magic if the wall is uneven. However, there might be one catch – if the wall has a bump on the way it can cause the batten to bend and we won’t get straight line anyway.
To avoid it check if you can fix the batten in the place you were planning to and it adheres to the surface.
If not get rid off the bugger. You always have a small room for adjustments while fixing the cabinets so don’t worry if it won’t be flawless piece of wood, fairly straight should be good enough.
Now, another challenge you might need to face while fitting your new kitchen is when you find out that walls are not square…
Which is another rather typical thing in old historical building like many you can find in Cambridge. Actually, it’s much safer to assume they are not square and then be pleasantly disappointed.
Right, so what can be done in such case?
Well, if the difference is tiny you can probably live with that and it’s not worth the hassle. If it’s slightly bigger you can actually use the trick with batten, but with slight modification.
This time the goal is not to make walls even, but to make them straight, so you have to establish where it should be and by how much it is off.
Once you’ve done that, fix a batten at your starting point, let’s say in the corner and fix the other end with necessary distance from the wall. The space above the cabinets can be then easily hidden behind the tiles.
If the difference is bigger you can consider to glue plasterboard to the wall with a use of bonding.
This material would be also very helpful in order to reduce bigger differences when the walls are not square. You only need to cover the corner with plasterboard and bonding underneath in a way it becomes perpendicular to the other wall. Job done.

Sometimes the cabinets you have chosen for your kitchen are heavier than other standard ones. It can also happen to be that you need to fix them to the plasterboard wall.
Can you actually do that? How can you ensure it won’t fall off causing a damage or even worse injure someone? We have prepared a separate article on that topic which you can find below.

This is How You Should Fix Heavy Cabinets to Plasterboard Wall Plasterboards have became standard way of interior finish to such extent that probably no

Everything You Need to Know About Kitchen Remodeling Alongside bathroom your kitchen is one of the most important rooms in your house. Of course all

A Simple Guide to Perfect Kitchen Design If your home had the heart and soul it would be your kitchen and bathroom without a shadow
This is How You Should Fix Heavy Cabinets to Plasterboard Wall Plasterboards have became standard way of interior finish to such extent that probably no
